Turning Plywood into Rustic Flooring – Part 2
I know you’ve all been eagerly awaiting the second part of this post. I am happy to be able to satisfy your curiosity by concluding the epic story of how to turn plywood into rustic flooring! Now, after all this time you’ll learn how to turn this…

Into this…!

As you might recall, I left you all with half of my floor glued & nailed down. What I expected to be a lightning fast completion of the In Law unit floor, turned into a bit more of a task then I had planned for. With that said, as with most of my In Law unit projects, I have a lot of information to share you. This time, however, I’d like to take you on a journey. Let’s begin this story…
IN A LAND FAR FAR…
…from Los Angeles, known as San Francisco…
Once upon a time, a powerful, wise and noble maiden worked tirelessly to renovate her castle. She was working hard to install a new floor without having to sell her best milking cow just to afford the materials. She finally completed the installation of the floor, with the help of her magical wand nail gun, and her trusty forest creatures glue applicator.

Once the floor was installed it was time to apply the stain. After testing out about 15 different colors the maiden called her creature friends with an announcement. “Hark dear friends, a decision has been made. From henceforth, the color of this floor will be known as Honey Maple.” Not wanting to get into the details of what led her to this color, the maiden simply explained that she chose the Zar brand of stain because Minwax and Varathane simply didn’t embody the beautiful hues of nature.
After applying the stain by hand everything was looking just as the stain’s name suggested, like someone had poured honey and maple syrup over the floor, leaving it with a beautiful golden gleam.
Even for a hardworking maiden in a castle far far away, the application process of stain was what you might expect. Dunk one rag into the stain and spread it around liberally. Then with a dry rag, wipe off all of the excess. Here’s the end result:


Things looked so good that the following day the maiden decided to seal in the blemish free wood with a coat of Polyurethane, locking in its youth for all time. She decided to use a water based Polyurethane because it dries so quickly, and because the creatures of the forest (i.e.: her dog & cat) could be impacted by the toxic fumes of an oil-based Polyurethane.
The maiden poured a strip of the Polyurethane (roughly 1” x 24”) directly over her Honey Maple floor and spread it out evenly by pushing and pulling with a microfiber applicator.

Finally, the floor was covered in the fresh shine of magical protective sealer.

Overnight, however, an evil sorceress entered the In Law unit. Threatened by the beauty and glimmer of the floor, she wielded her magical broom and soaked up the stain so that there were huge spots where it didn’t even look as if stain was applied. Cackling with satisfaction, she then covered over her handiwork with the polyurethane and fled to torment another unsuspecting DIY’er.

The next morning, the maiden headed down to her In Law unit, whistling a happy tune, when she stopped, stunned and terrified by the sight before her! SPLOTCHES! Everywhere!

She had no idea how this had happened but suspected that evil was afoot. What else could explain…this!?
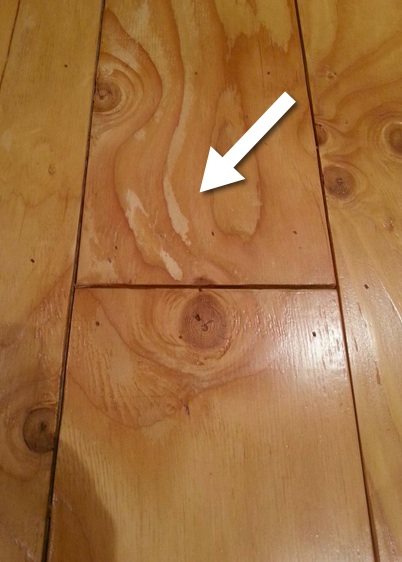
The maiden, being more powerful than the cackling witch had assumed, pulled up her Cartharts and went right to Google. She typed and clicked and read and watched until the answer came to her. “Softwood” the Google machine whispered to her…blame softwood.
The Google machine went on to explain “oh powerful maiden, while you may be strong, your plywood is soft. It is made of Pine, which has inconsistent pores. Some pores are open and some are not, so some stain will soak in and some will not. Had you consulted me before applying the stain you would have known that applying a wood conditioner or Tung oil before applying the stain might have solve the problem. Alas, with your hard body comes a hard head, and this is how your lesson will be learned.”
After promptly slamming closed her laptop, cursing the Google machine and its all knowingness, the maiden went back to work.
In her rush to fix the problem bestowed upon her by the evil sorceress, the maiden rented a floor buffer to try and take the layer of Polyurethane off. Unfortunately for her, the floor buffer was possessed and merrily threw her around the room like a doll.
While she did get free dancing lessons from the possessed beast, the polyurethane remained in place. The maiden then went to her trusty palm sander. After sanding her way through the protective layer, she applied around 4 more coats of stain over the many unstained spots. The reason for the extra coats was because the stain just didn’t want to soak into those spots. Whatever evil magic that prevented the stain from sticking before, was still an issue when trying to reapply.
Finally, after the final application of stain, the maiden’s floor had been evened out. After a solid vacuuming, then using a tack cloth to get up the remaining dust, she returned to applying Polyurethane. This time, when the sealer dried the floor had the sparkle of honey, just as she had wanted. Rather than bringing back the possessed buffer, she decided to use a pole sander and 180 grit sand paper to get rid of the bumps between layers of Poly.

Finally, 3 coats of Polyurethane later, the powerful maiden was able to call her new floor complete!


She never saw that evil witch again, but she knew she was out there…waiting…

This is the funniest post and was SO much work and effort and problem solving! The floor looks amazing and I hereby attest to it taking weeks of Beth’s every waking moment. I’d also like to say that I was not the evil witch in the story.
Beth,
It looks amazing!!!
Love, Vic
>
Beth, I’m happy your powers have prevailed over the evil witch! Great job with the blog— and the floor! Terry
Sent from my iPhone
>
Ha! This made me laugh out loud, hard bodied, maiden! I always knew you would thwart that evil sorceress. Hurrah!
Hilarious account of an obviously epic journey. I’m glad it led you to your desired destination, fair maiden. Looks awesome.
Laugh out loud, omg that video. I am so impressed with your patience to this job!
The floor is absolutely beautiful, I am sorry it was so much more work than you ever thought it would be!!
Hi Beth! What a wonderful, playful and creative twist in this latest story of your flooring escapade! You succeeded in figuring out how to correct the earlier problem and good , once again, triumphs over evil!!! I do hope you take all your blogs and turn them into a book that you publish. It’s a chronicle of not only all you’ve accomplished in your new in-law apartment, but also a delightful, informative and utterly charming story! Meg says it’s looking so lovely! Yay, Beth! Take care, and say hi to your mom next week. Have a lovely visit with her! I imagine you are getting so psyched about your up-coming trip!!! You’ll have a blast, Beth! Love, Joan Date: Wed, 6 Aug 2014 01:01:47 +0000 To: wolohan@hotmail.com